WordPress | ACF PRO – Introducing Blocks for Gutenberg for slick carousel developing
WordPress, from the 5.0 version, definetely will integrate the “Block Editor” ( Gutenberg ), so i want try to integrate custom blocks, and create custom field for them.
Advanced Custom Fields , come in help for this.
First of all we need to have WordPress 5.0-beta3 and ACF – 5.8.0-beta2 ( at this moment is available only for PRO version ).
Once installed wordpress and activate the acf plugin, we can start develop our custom block.
We want create a block that able to insert an “image carousel” developed using “Slick Carousel” library.
Let’s start:
Open functions.php from your theme and add this snippet:
// Register a Images Carousel ACF Block
if( function_exists('acf_register_block') ) {

	$result = acf_register_block(array(
		'name'				=> 'image_carousel', // Name of our block
		'title'				=> __('Image Carousel'), // Title of our block
		'description'		=> __('A custom Image Carousel block.'), // Description of our block
		'render_callback'	=> 'image_carousel_block_html',// Callback function ( the once that contain the template of our block )
		'category'		    => 'layout',// The category in which the block will be inserted
		'icon'			    => 'format-gallery', // The icon associated with the block ( choose from wordpress dashicons )
		//'keywords'		=> array(),
	));
}
Basically with this function we “register” our custom block.
Now we have to create the “callback” function ( one that contain our carousel template code );
Open functions.php from your theme and add this snippet:
// Callback to render the testimonial ACF Block
function image_carousel_block_html() {

}
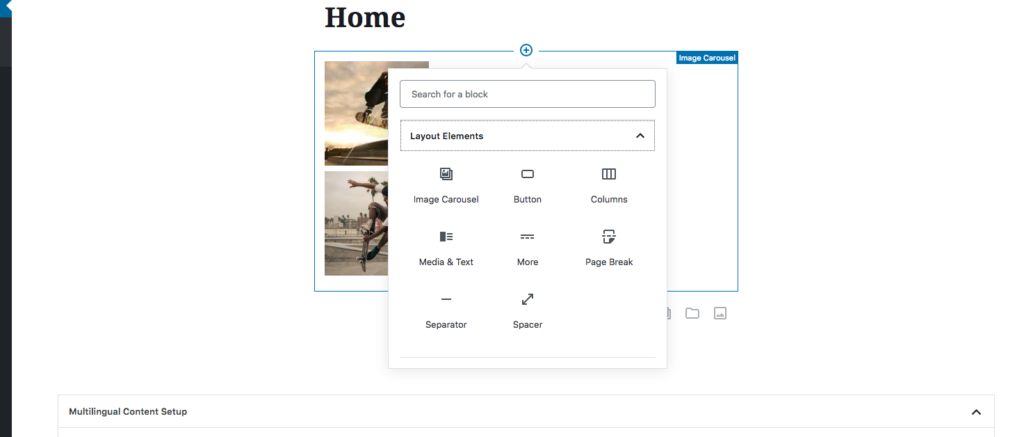
If all it’s right, now you can navigate to “Add new Page” and by searching in the blocks, under “Layouts Elements” category, find “Image carousel” and you can add as block.

Same thing for the Custom Fields Group.
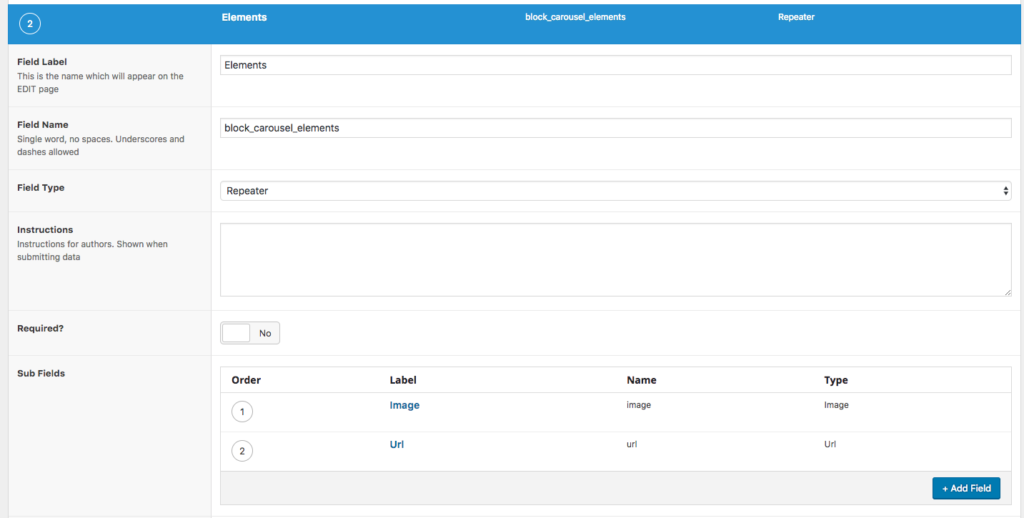
Navigate to “Advanced Custom Field” and click “Add New”, in the “Location” settings you can select “Blocks” and “Image Carousel”.

Now you can create the Fields to associate with the carousel in my example is a repeater field, with two subfield, once for the image and one for the url.

Now we can “develop” the template of our carousel.
Paste this code inside the “image_carousel_block_html” function:
// Check for needed files for Image Carousel Block
	// Check if " slick.min.js " is "enqueued", if so next step, else, register it
	$handle = 'slick_JS';
	$list = 'enqueued';
	if (!wp_script_is( $handle, $list )) {
		wp_register_script( 'slick_JS', get_template_directory_uri() . '/js/slick/slick.min.js');
		wp_enqueue_script( 'slick_JS' );
	}
// Check if " slick.css " is "enqueued", if so next step, else, register it
	$handle_css = 'slick-css';
	$list_css = 'enqueued';
	if(!wp_style_is($handle_css, $list_css)){
		wp_enqueue_style( 'slick-css',  get_template_directory_uri() .'/css/slick/slick.css' );
	}
// Include the partials files with the template.
	include( STYLESHEETPATH . "/partials/blocks/block-image_carousel.php" );
In my example i have created, under the root of my theme, a folder called “partials” and inside this a folder called “blocks”. Here i store all my blocks template files.
Inside this folder create a file called “block-image_carousel.php”, and add this code:
<?php
/**
 * Block Name: Testimonial
 */

if ( have_rows('block_carousel_elements') ) : ?> // Check if repeater file is compiled
<div class="grid-container"> // i use foundation as framework, here some foundation class
 <div class="single_block_carousel_elements grid-x grid-padding-x">
	 <?php while( have_rows('block_carousel_elements') ) : the_row(); ?>
	 <div class="single_slide cell small-12">
	 <?php

			$image = get_sub_field('image');

			if( !empty($image) ):

				// vars
				$url = $image['url'];
				$title = $image['title'];
				$alt = $image['alt'];
				$caption = $image['caption'];

				// thumbnail
				$size = 'large';
				$thumb = $image['sizes'][ $size ];
				$width = $image['sizes'][ $size . '-width' ];
				$height = $image['sizes'][ $size . '-height' ];

		?>
		<?php if ( get_sub_field('url') ) : ?>
			<a href=" <?php echo get_sub_field('url'); ?> ">
		<?php else : ?>
			<a class="fancybox" href="<?php echo $thumb; ?> ">
		<?php endif; ?>
				<img src="<?php echo $thumb; ?>" alt="<?php echo $alt; ?>" width="<?php echo $width; ?>" height="<?php echo $height; ?>" />

			<?php endif; ?>
			<?php if ( get_sub_field('url') ) : ?>
				</a>
			<?php endif; ?>
	</div>
	 <?php endwhile; ?>
</div>
</div>
 <?php endif; ?>
Last thing that we need to do is initialized our “carousel”.
Open a .js file from your theme folder ( in my case i use a main.js file that contains all my custom js ), and add the slick initialization:
// Carousle Block
$('.single_block_carousel_elements').slick({ // if you go to slick carousel documentation, you can find more option to add
  dots: true,
  infinite: false,
  speed: 300,
  slidesToShow: 2,
  slidesToScroll: 2,
  responsive: [
    {
      breakpoint: 1024,
      settings: {
        slidesToShow: 2,
        slidesToScroll: 2,
        infinite: true,
        dots: true
      }
    },
    {
      breakpoint: 600,
      settings: {
        slidesToShow: 2,
        slidesToScroll: 2
      }
    },
    {
      breakpoint: 480,
      settings: {
        slidesToShow: 1,
        slidesToScroll: 1
      }
    }
  ]
});
That’s all , go back to a page ( from backend ) and add a new “image carousel block”, on right side you’ll see the option for add the carousel rows.
Add some images, save and, from frontend, reload the page, now you see your carousel in action.
If you need you can add the necessary css for adapt the carousel to your theme.

Here you can find the example files of a “Gutenberg Slick Slider Block” for download.
That’s all, from now you can add as many carousel as you need.

